The ProjectStream Configurator is a Power Apps application that can be used to create complex project configurations using existing products, material and labor templates. The configurator increases productivity and accuracy when formulating a project proposal and budget by providing a solution to assemble an accurate configuration from pre-existing templates, with the ability to fully customize those product configurations. Customized business rules provide the logic and validation for the assembled configurations,
The generated configurations include full material and labor definitions as well as quantity, costing and billing amounts. The configurations can be automatically processed into a project budget that can be used in the proposal stage for accurate project material and labor estimation as well as cost and pricing. The products, templates and other related data are customized to your specific business condition.
The Configurator features picklist product assembly configurations that can be selected from a template gallery organized into business-specific categories. Multiple product configurations can be selected and customized for a project. Product configuration templates provide a standard bill of materials listing as well as associated labor components, and these product configuration attributes can be customized to include specific materials from a third-party vendor or your manufacturing operation. Customization can also include changes to material quantities as well as product and labor attributes and variants.
Once a product configuration is assembled, the Configurator provides a Validation function, and upon successful validation, a Generate function that creates the product configuration details, a specific bill of materials and labor that closely aligns to a project budget configuration. The generated product configuration details can be modified as needed within the Configurator, and then, finally, a Process function converts the configurations into a project budget, complete with all material and labor quantities, costing and pricing.
Loading the Configurator
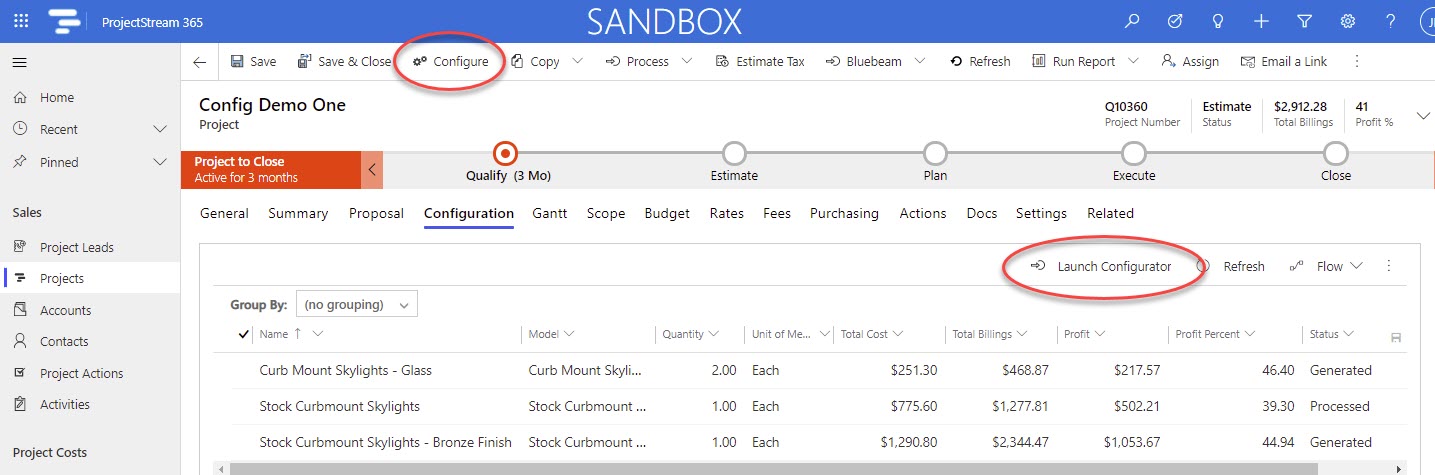
The Configurator is loaded by selecting the Configure menu button or the Launch Configurator (Configuration tab) when on a project view. It will open in a modal dialog window and will first display the parent project information and any existing project configurations. Existing project configurations can also be viewed in the Configuration Tab on any project.
Managing Project Configurations
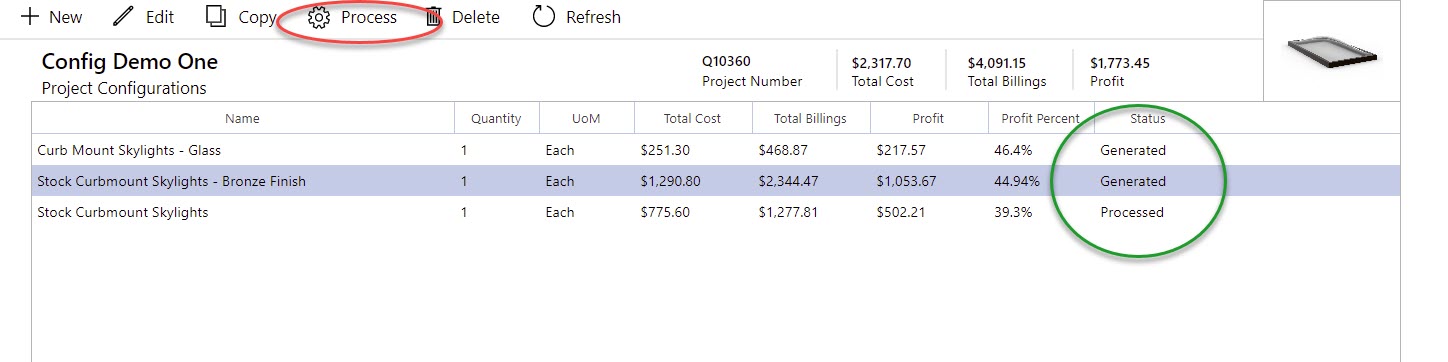
The initial screen displayed in the Configurator is a Project Configuration view that displays all of the existing project configurations for the selected project. Project information, including the project name and number as well as total cost, billings and profit are displayed.
A number of functions are provided to manage project configurations:
New: a new project configuration can be created, which will be added to the existing project configuration list.
Edit: select a project configuration row and select Edit to view details and edit an existing configuration.
Copy: select a project configuration row and select Copy to copy an existing configuration into a new configuration.
Process: select process to create or refresh a consolidated project budget from the current list of project configurations. Note that this command is only available if all project configurations have a current status of either Generated or Processed. Records with a status of New or Validated require validation and generation before they can be processed. Select Edit to perform these actions and then return to this screen to process.
Delete: select a project configuration row and select Delete to delete an existing configuration.
Refresh: select this button to refresh the view of project configurations.

Create a New Project Configuration
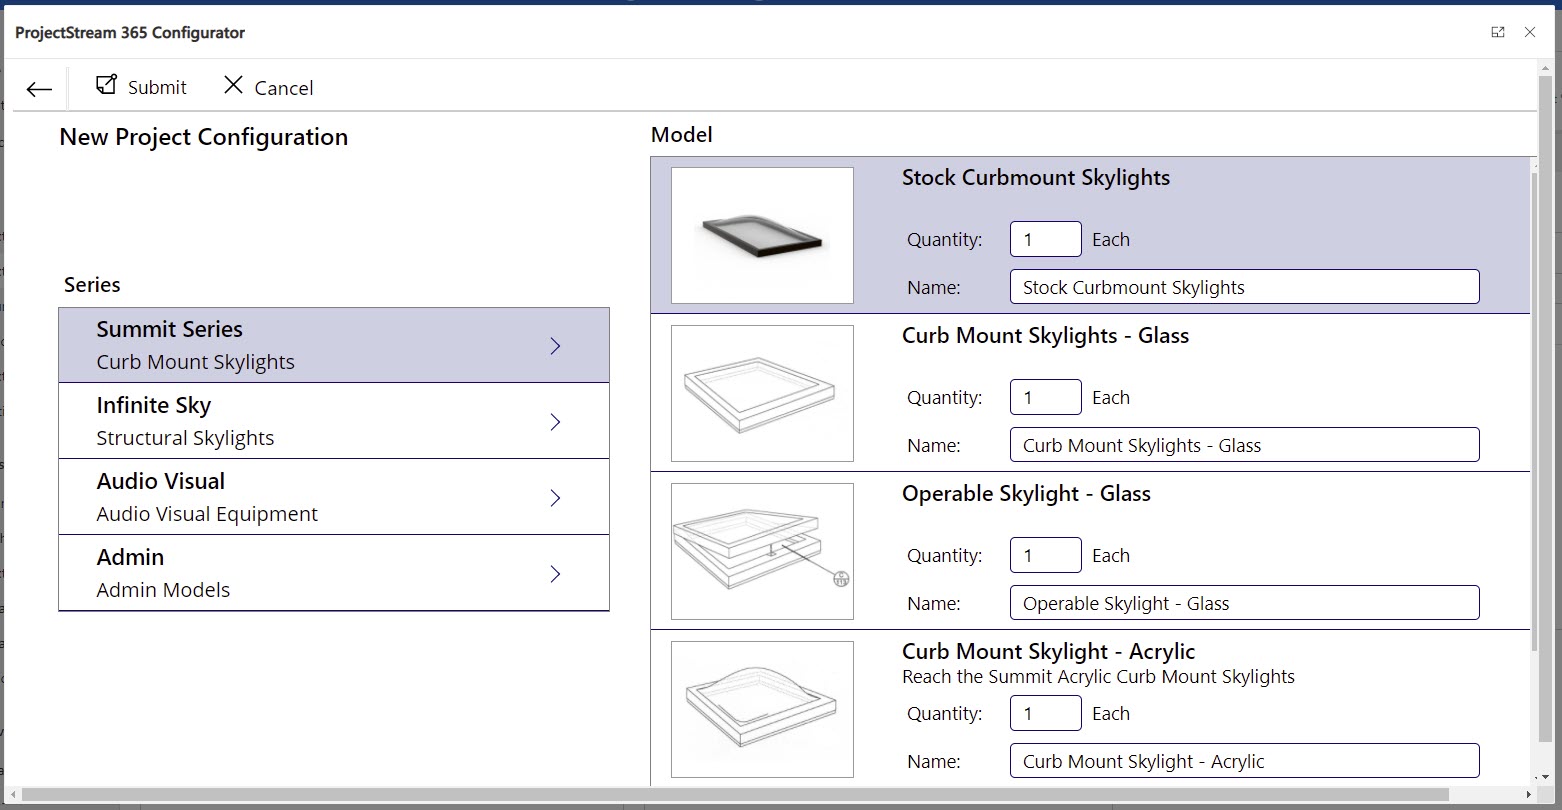
New Project Configuration is the first screen shown when loading the Configurator. It provides a picklist of possible configurations, categorized into business-defined groupings. It also provides configuration information - an image of the configuration assembly and the default name and quantity for the configuration assembly.
To create a new project configuration, select an assembly. Optionally, change the default quantity and name of the configuration assembly to be created (these can also be changed later in Edit) and select the Submit button.
Manage a Project Configuration
This is the primary screen used when managing a specific configuration in the Configurator. A configuration is comprised of its Attributes that are used to define the configuration assembly as well as its Details that are the resulting material and labor components of the configuration assembly.
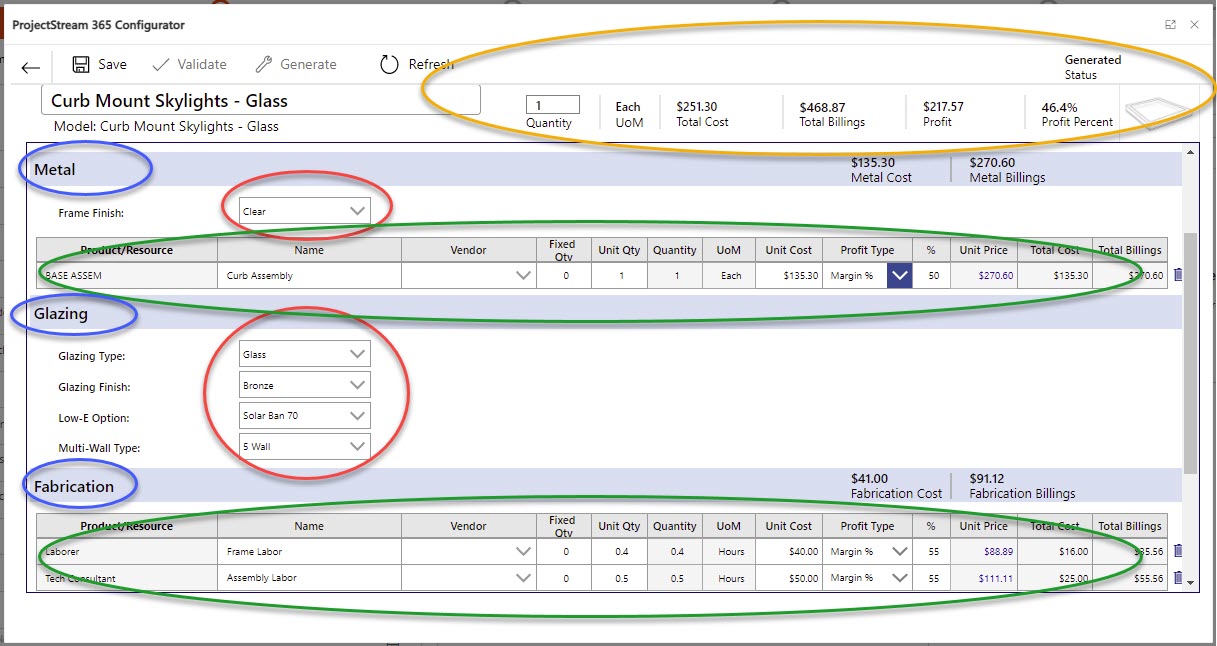
A summary header (circled in orange, below) displays current information on the project configuration:
Status: current status of the project configuration. Values include New, Validated, Generated and Processed.
Configuration Name and Model: Default name and model (category) of the configuration. The configuration name can be modified at any time.
Quantity: The number of configuration assemblies to include in the project and its budget. The quantity can be modified at any time.
Unit of Measure (UoM): The unit of measure of the project configuration is displayed. This is set and loaded from the configuration template.
Total Cost and Total Billings: The total cost and billings of the configuration, based on the summation of all displayed details of that configuration.
Profit and Profit Percent: The configuration profit and profit percent calculation, based on the total cost and total billings calculations.
The main section of the screen is comprised of the configuration's Attributes (show in red, below)and Details (shown in green), organized into Categories (shown in blue), which are also defined in the configuration templates. Attributes are shown as label/control rows at the top of each category, and Details are shown in table format below attributes.
Attributes
When creating a new configuration, a template is used to automatically define which Configuration Attributes and their values that are relevant for that configuration. After selecting and submitting a new Project Configuration, this screen will display those attribute values, organized into categories for easy management. Using a combination of attributes, complex configuration assemblies can be created from templates and customized picklists and product lists.
This screen is also the primary screen used to edit and revise project configurations. Any existing configuration can be flexibly modified by changing attributes or by changing generated details.
There are several types of attributes. Depending on the attribute type, a different control is provided to view/edit values:
String or Numeric: Attributes that are string or numeric types are presented as an editable text box. A default value is optionally displayed if a default value is set in the template configuration. Examples include length or width of an assembly that is being configured. The template can also be configured with a suffix label that will be added to the
Picklist: Attributes that can be defined as a picklist of values are loaded as a picklist control, where any of those values can be selected. A default value is optionally selected if a default value is set in the template configuration. Examples include a predefined color or finish of an assembly that is being configured.
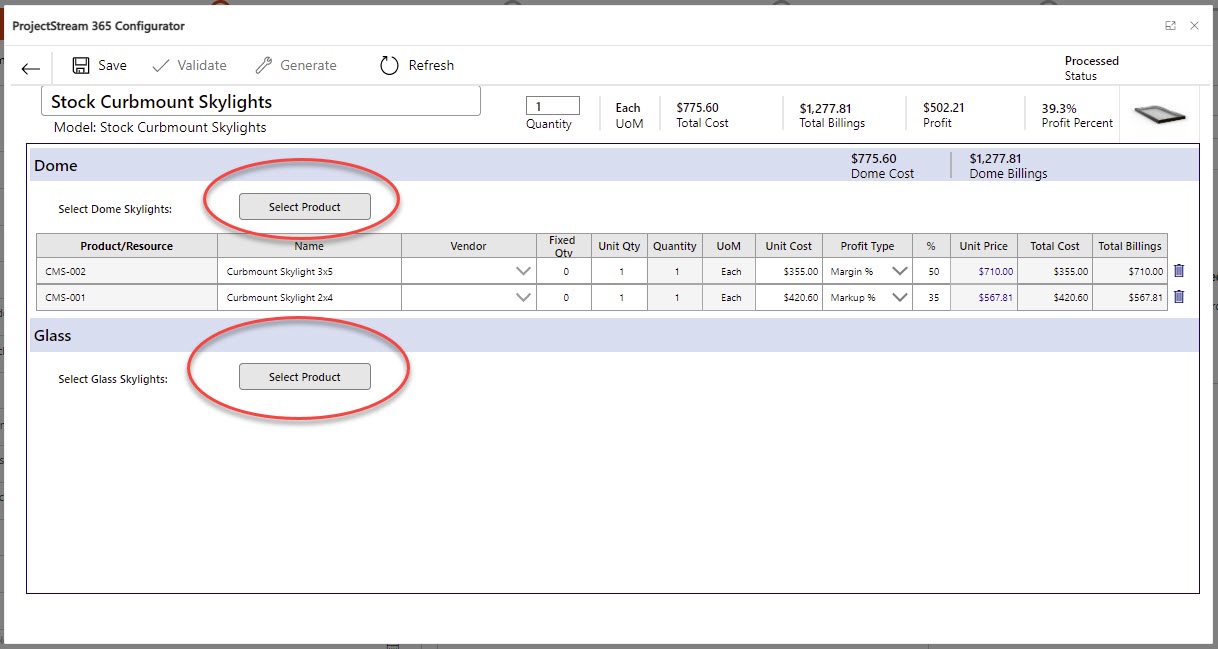
Product: If the configuration assembly partially consists of existing products, a product attribute can be defined. This presents a button control that allows for specific product(s) to be selected and included in the configuration assembly.
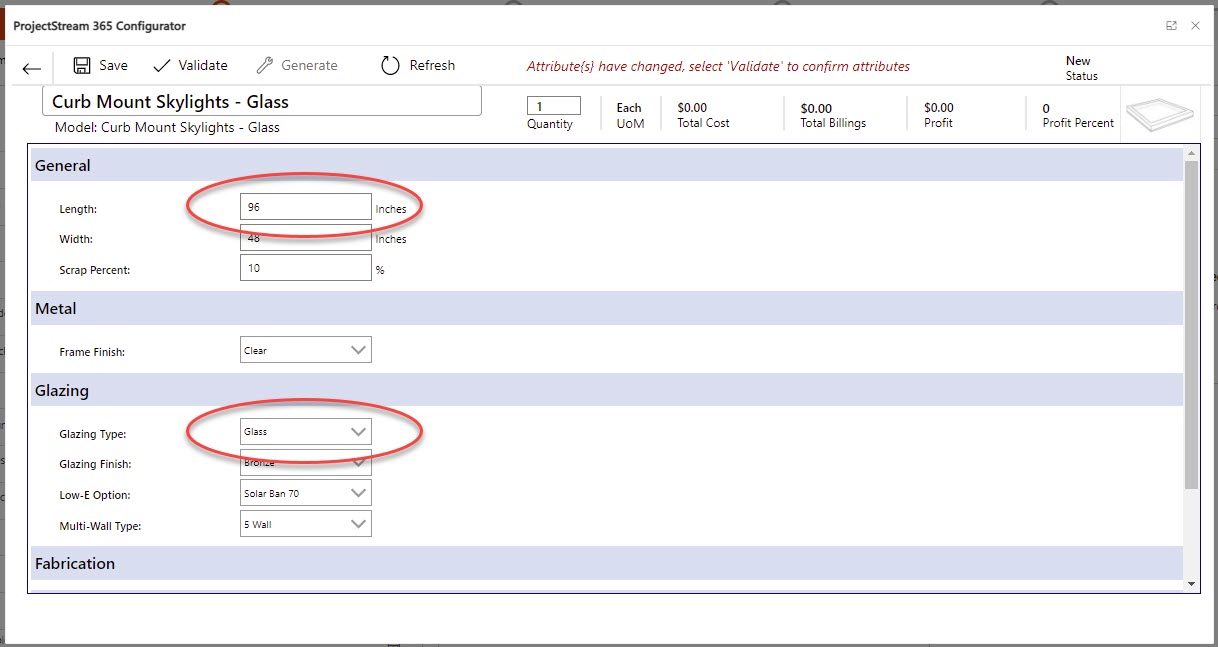
The following screen shows String and Numeric attribute types and Picklist attribute types. The Length attribute shows an example of a suffix label, showing the Length unit of measure is to be in inches:
The following screen shows two Product selector attribute types, implemented as customized buttons. One product configuration shows an example details table with two rows, produced when the button is selected and product(s) are selected to add to the configuration (discussed below).
Validation of Attributes and Generation of Details
Once attribute revisions have been completed, select Validate to ensure that attribute values are correct and complete. Validation is an important step to ensure that the next step, Generate, will be able to correctly create all of the subsequent details from the attributes. Generate cannot be performed until Validation is successful without errors.
If errors are found during Validate, attributes in error will show an error message in red in the space after the attribute in error. Fix the attribute values and reselect Validate until a clean validation occurs, the configuration Status is set to Validated, and the Generated button is Enabled.
Once validation is successful (status is set to Validated), select the Generate button to generate the Details of the configuration. Details will be displayed in a tabular format at the bottom of each category. The specific details are generated based on the templates and business logic used to configure the Configurator.
Note
Any change to an attribute value will require a validation and generation of new project configuration details. A message "Attribute{s} have changed, select 'Validate' to confirm attributes" will be displayed. Select the Validate button when you have finished modifying attributes and wish to regenerate new details based on the new attribute configuration.
Details
Configuration Details are automatically created from the Generate button using attribute data. Details, presented in tabular format within each category, are the resulting details of the project configuration. Details are directly used in the Process operation to generate project budget line items.
Details can be edited or deleted. New details cannot be added directly, although new detail lines can be generated by a modification of attributes.
A detail record contains key information needed to generate a fully formed budget line item. Each detail has several fields that are either read-only, editable or auto-calculated from other fields. Editable cells have a white background, read-only or calculated cells have a light-gray background. Each detail has the following fields:
Product/Resource: Read-only. Depending on the type of detail, this field either holds the product id, if related to a product, or the resource id, if related to labor.
Name: Editable. The name of the detail record.
Vendor: Selectable. Picklist of active accounts that are vendors.
Fixed Qty (fixed quantity): Editable. The fixed quantity portion of the total quantity.
Unit Qty (unit quantity): Editable. The unit quantity portion of the total quantity.
Quantity: Calculated. Equal to the unit quantity times the configuration quantity, plus the fixed quantity.
UoM (unit of measure): Read-only. The unit of measure for the quantity and unit cost.
Unit Cost: Editable. The unit cost of the detail record. Depending on the type of detail, this is set with a default value equal to a product unit cost, a labor type unit cost or assembly unit cost.
Profit Type: Selectable. Picklist of profit types. By default, this is set according to the project profit type. Picklist values are None, Markup%, Margin% or Price Rate. This field is used to determine Unit Price. None would set a unit price of $0, Markup% and Margin% would calculate Unit Price from Unit cost using a markup or margin formula and Price Rate would allow the Unit Price to be set to a value.
% (profit percentage): If Profit Type is set to either Markup% or Margin%, this percentage is used in the calculation to determine Unit Price from Unit Cost.
Unit Price: Editable if Profit Type is set to Price Rate, otherwise Calculated. This is the calculated or set unit price of the detail.
Total Cost: Calculated. Total cost is calculated from unit cost times quantity.
Total Billings: Calculated. Total billings is calculated from unit price times quantity.
Note
Markup% uses the standard formula: Markup% = (Total Billings - Total Cost) / Total Cost
Margin% uses the standard formula: Margin% = (Total Billings - Total Cost) / Total Billings
Editing any detail field will generate an attention notice at the top of the screen: "Detail{s} have changed, select 'Save' to save details". Select the save button to save any detail changes. Detail changes do not require a further validation or generation.
Once complete with any attribute or detail edits, ensure that the configuration has been properly Validated and the latest details Generated. The configuration Status in the top right should signify generated. This status ensures that the configuration record is complete and details are up-to-date.

Process Configurations to Project Budget
Processing configurations will create new Project Tasks (Gantt) and Project Budget line items based on the set of generated project configurations.
To Process, return to the initial screen in the Configurator to process configurations into the project button. The left arrow button can be used to navigate back to this screen.
All listed configurations should have a status of Generated or Processed in order to process the configurations into the project budget. If a status of New, Validated or Error is shown for any configuration record, the Process button will be disabled. Edit a configuration record to fix and update its state to Generated.
If all configuration records have a status of Generated or Processed, the Process button will be enabled. Select the Process Button to create project budget records from all of the listed configuration records. Exit from the Configurator and return to the project by pressing the X in the top right corner of the Configurator screen.
Note
The Process operation will replace existing project tasks (Gantt) and project budget line items with new project tasks and project budget line items based on the current set of project configurations. Use with caution if you have customized any current project tasks or budget line items, those will be removed and replaced. You may revise configurations at any time and then run Process when complete.
Back on the Projects form in ProjectStream, select the Budget tab in the project to review all of the newly created budget line items. On the Gantt tab, review the new Gantt model with project tasks that were also newly created.
You can also review the configurations in the Configuration tab.
If you want to change or add new configurations, you can select Configure at any time to open the Configurator for adding new configurations, editing existing configurations and generating new project tasks and budget line items.


