
Enter / Edit a Purchase Order
Entering or editing a Purchase Order (PO) in ProjectStream 365 provides a structured way to document and manage purchases from vendors for project materials, subcontracted services, equipment, and other requirements. The process consists of two distinct steps: first create and save the PO header, then add the individual PO Line Items. This ensures the vendor, project, shipping, and purchasing information is established before the items being purchased are entered.
✅ Goal
Create and maintain a Purchase Order by first establishing the PO header and then adding the required PO Line Items. This provides a complete purchasing record that identifies the vendor and overall purchasing requirements while capturing the individual products, services, projects, quantities, costs, and delivery requirements being purchased.
📍 When to Use
Enter or edit a Purchase Order when materials, products, subcontracted services, equipment, or other items need to be purchased from a vendor.
Use Purchase Orders to:
- Document purchases from approved vendors.
- Associate purchases with a project.
- Establish required and promised delivery dates.
- Identify where purchased items should be delivered.
- Create individual lines for the products or services being purchased.
- Track the PO through approval, release, receipt, invoicing, and completion.
- Maintain purchasing commitments against project requirements.
Purchase Orders can also be generated automatically through ProjectStream 365 Purchasing Planning when purchasing demand has been identified and processed.
Note
Purchase Orders can be created directly within a project by selecting the Purchasing Tab on a project
Note
Users can automatically generate POs from the Purchasing Requirements Planning function
🚶➡️ Step-By-Step Guide
📋 Procedure
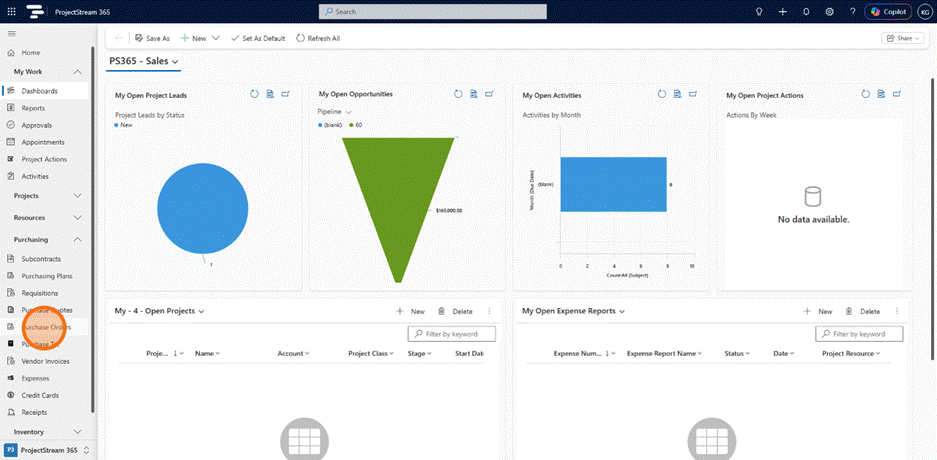
1. Navigate to Purchase Orders
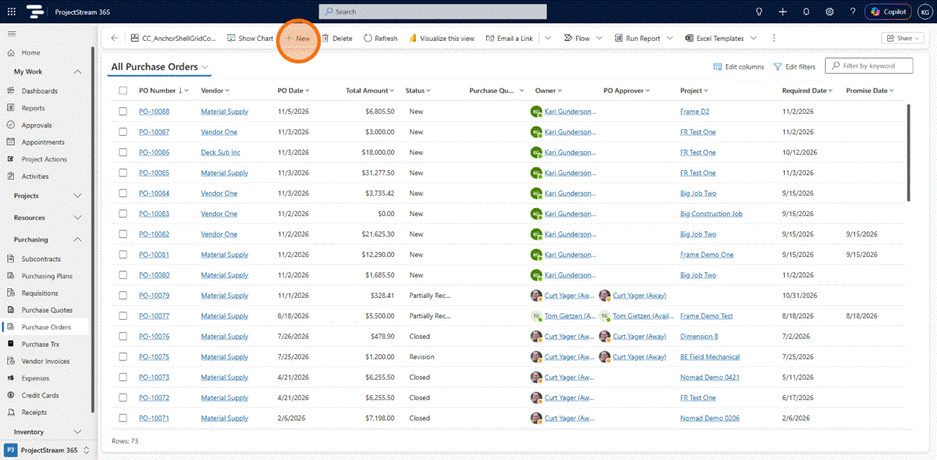
2. Click +New
3. Enter the PO Header General information
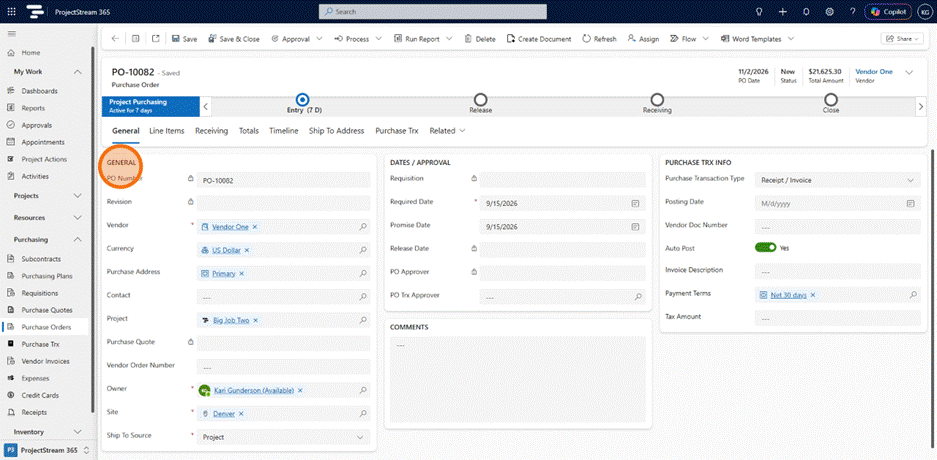
General
| Field | Description |
|---|---|
| PO Number | The unique number assigned to the purchase order for identification and tracking. |
| Revision | The revision number associated with the purchase order, providing a record of changes made through the PO revision process. |
| Vendor | The supplier from which the products, materials, equipment, or services are being purchased. |
| Currency | The currency used for the purchase order amounts and transactions. |
| Purchase Address | The vendor address associated with the purchase order. |
| Contact | The vendor contact associated with the purchase order. |
| Project | The project associated with the purchase order and its purchased goods or services. |
| Purchase Quote | The vendor purchase quote associated with the purchase order, when applicable. |
| Vendor Order Number | The vendor's reference or order number associated with the purchase order. |
| Owner | The ProjectStream 365 user responsible for the purchase order record. |
| Site | The organizational site associated with the purchase order. |
| Ship To Source | Identifies the source used to determine the destination for purchased goods or services. In the example shown, the ship-to source is Project. |
4. Enter the DATES / APPROVAL information
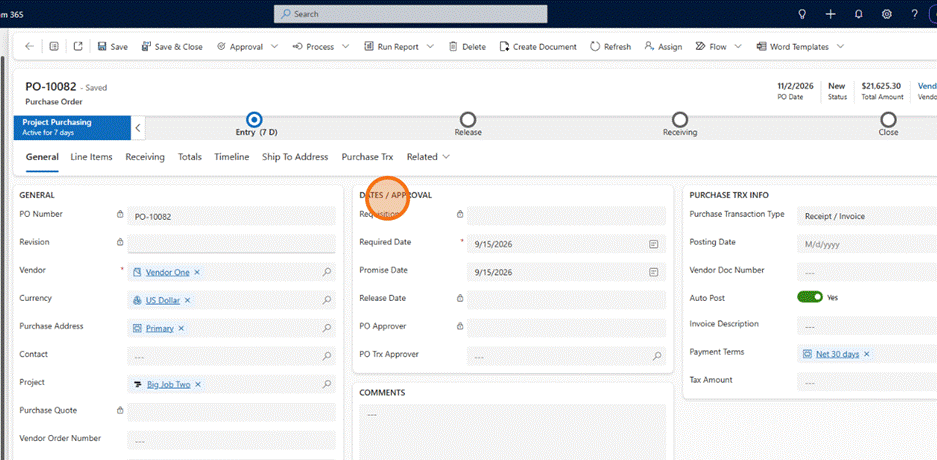
Dates / Approval
| Field | Description |
|---|---|
| Requisition | The purchasing requisition associated with the purchase order, when the PO originates from a requisition. |
| Required Date | The date by which the purchased products, materials, equipment, or services are required. |
| Promise Date | The date the vendor has committed to delivering the products, materials, equipment, or services. |
| Release Date | The date the purchase order is released for purchasing and fulfillment. |
| PO Approver | The person associated with approval of the purchase order. |
| PO Trx Approver | The person associated with approval of purchase order transactions. |
Comments
| Field | Description |
|---|---|
| Comments | Additional information, notes, instructions, or other details associated with the purchase order. |
5. Click Save to create the PO Header
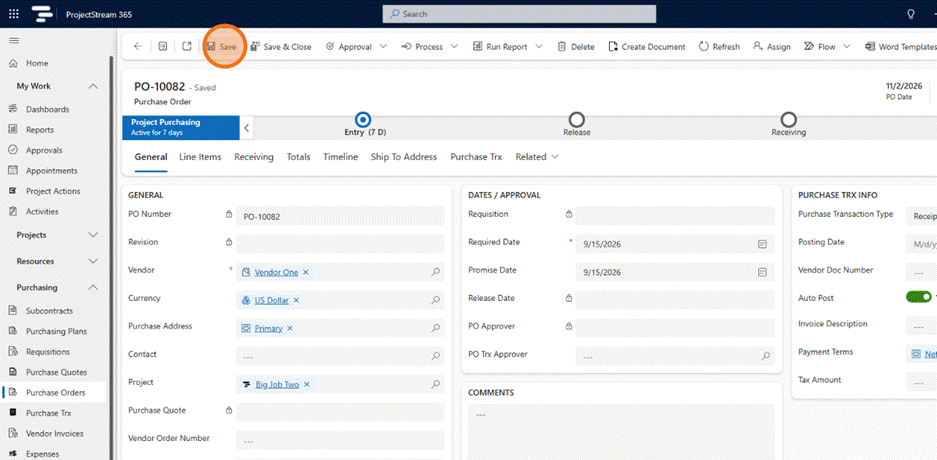
6. Click the Line Items Tab to enter PO details
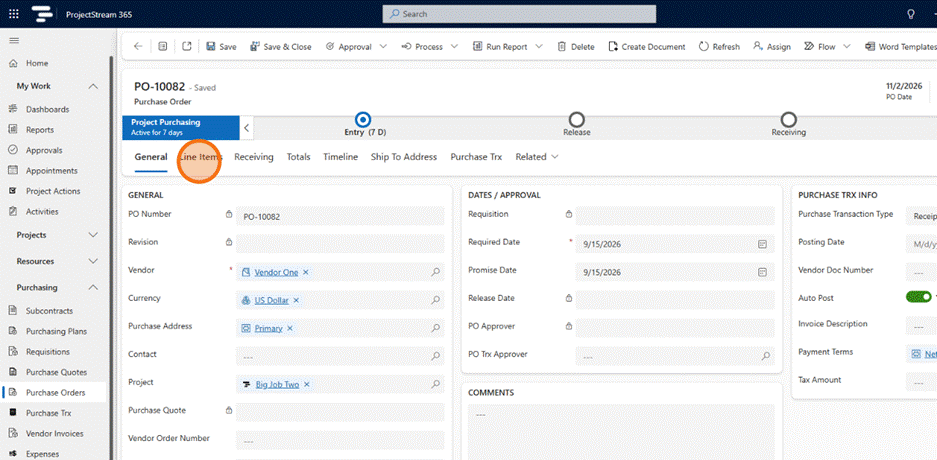
7. Click +New PO Line
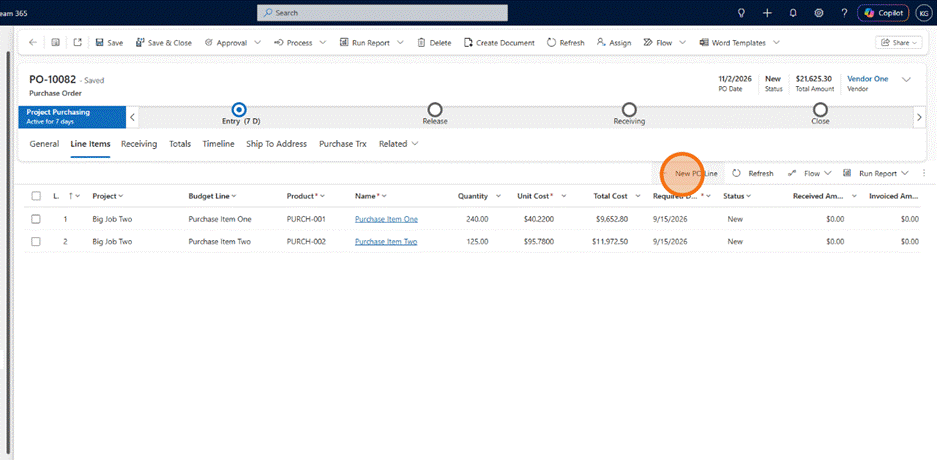
8. Enter the PO Line Item information
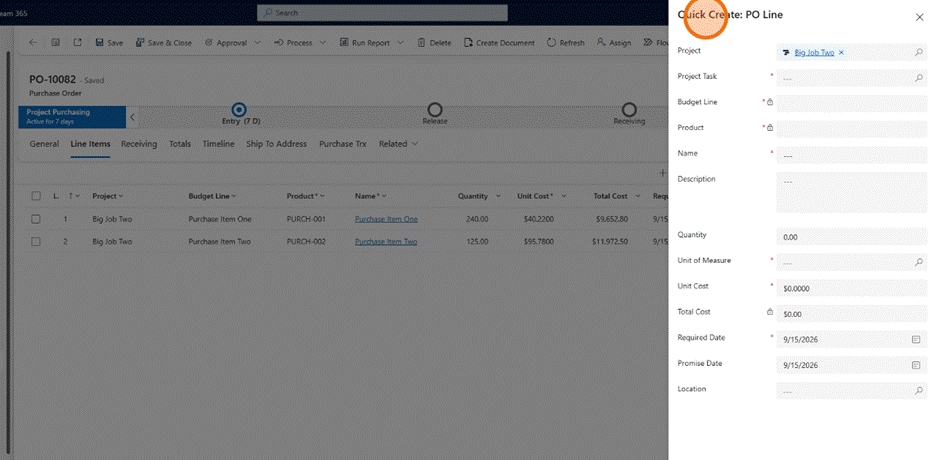
| Field | Description |
|---|---|
| Project | The project associated with the purchase order line item. |
| Project Task | The project task associated with the purchased product, material, equipment, or service. |
| Budget Line | The project budget line associated with the PO line, maintaining the relationship between the planned project cost and the purchase commitment. |
| Product | The product associated with the purchase order line. |
| Name | The name used to identify the purchase order line item. |
| Description | Additional information describing the product, material, equipment, service, or purchasing requirements associated with the line item. |
| Quantity | The quantity of the product, material, equipment, or service being purchased. |
| Unit of Measure | The unit used to measure the quantity of the purchase order line item. |
| Unit Cost | The purchase cost for one unit of the line item. |
| Total Cost | The calculated total cost of the purchase order line based on the quantity and unit cost. |
| Required Date | The date by which the purchased item or service is required for the project. |
| Promise Date | The date the vendor has committed to providing or delivering the purchased item or service. |
| Location | The location associated with the receipt, use, or delivery of the purchased item or service. |
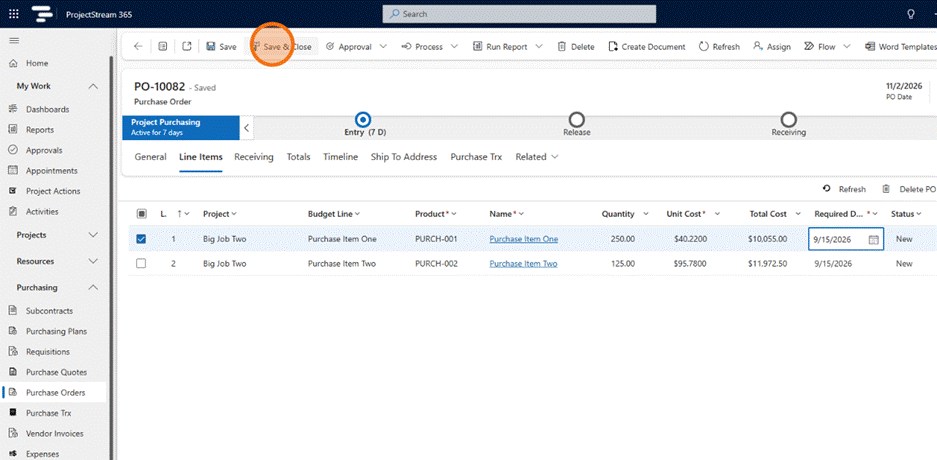
9. Click on fields on existing PO Lines and enter edits
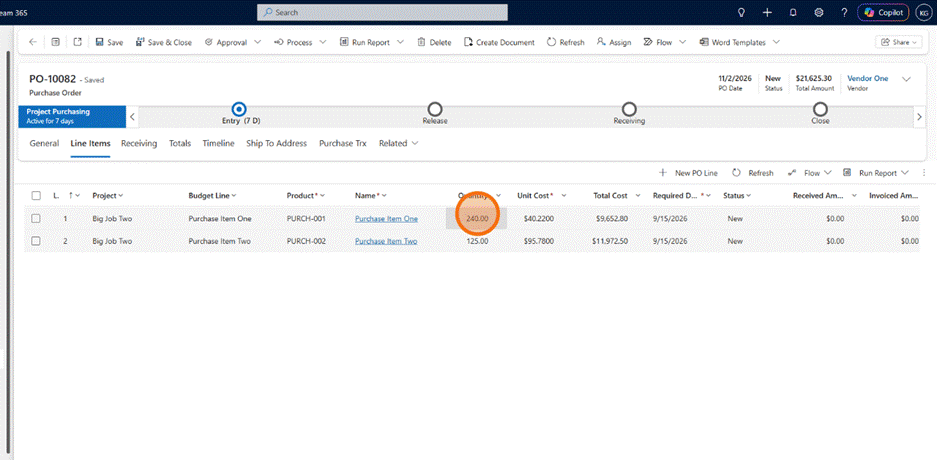
10. Click Save & Close
✅ Result
After saving the Purchase Order:
- A PO header identifies the vendor and overall purchasing requirements and details that will default to the line items.
- ProjectStream 365 assigns the Purchase Order number when the header is created.
- Individual PO Line Items identify the products or services being purchased.
- The Project from the header defaults onto new lines, while individual lines can reference different projects when required.
- Required dates can default from the PO header and be adjusted at the line-item level.
- The Purchase Order can progress through the applicable approval, release, receipt, invoicing, and close processes.
💡 Tips
- Think "Header first, Lines second." Establish and save the PO header before entering detailed purchase requirements.
- Verify the Vendor and Project before adding lines because header information provides defaults for subsequent PO Line Items.
- Use the Required Date on the header when most lines share the same requirement date. Override the date on individual lines when delivery requirements differ.
- Verify the Ship To information before releasing the PO to the vendor.
- A PO can include purchases for multiple projects. Review the Project on individual lines when consolidating purchases.
- Once a PO is approved, some information becomes restricted. Changes to PO Line Items or other locked fields require the PO to be placed into Revision status. ProjectStream 365 creates a revision record and increments the revision number as part of this process.
- After a PO is released, receiving and invoicing are handled through Purchase Transactions.
🔗 Related Actions
- ➡ Generate POs from Purchasing Plan
- ➡ Submit a Purchase Order for Approval
- ➡ Approve a Purchase Order
- ➡ Release a Purchase Order
- ➡ Revise a Purchase Order
- ➡ Enter Purchase Transactions
- ➡ Approve or Reject a Purchase Invoice
- ➡ Post a Purchase Transaction
🧭 What Happens Next?
After the PO header and Line Items are complete, review the Purchase Order for accuracy and move the PO through the applicable approval and release process. Once released to the vendor, receipts and invoices can be recorded against the PO through Purchase Transactions. These transactions update project costs and the amounts payable to the vendor as purchased items or services are received and invoiced